Sequencing Java - The Definitive Guide Part 1
Java is a necessary evil in today’s enterprise desktop. It is required by various business critical applications, yet it is the number one target for malware, made worse by the fact that people don’t always apply the latest security updates because they have an application that depends on an older version (or simply not bothering to regularly test their applications with each new release!).
A great solution to this is to use App-V to virtualise older Java versions then link them to the applications (or browser shortcuts) that depend on them. Then the locally installed Java version can be kept up to date, or even removed entirely. There are a few problems that I have commonly seen with this:
- The solution does not always work as intended. Mostly the browser opens in the virtual environment with the desired version of Java, but sometimes it can ignore that and open the locally installed version. Sometimes the browser can hang or crash. Also to make it more complicated, these issues can often affect some users but not others.
- App-V 5.0 SP2 now virtualises ActiveX control and Browser Helper Objects and presents them to the local Internet Explorer. Unfortunately this causes issues when we are virtualising legacy plugins and do not want the native browser to see them!
- Once the browser has been opened in the virtual environment with a legacy Java version attached, there is nothing to stop the user continuing to use the browser window to go about their daily business, where they are a potential open target for malware.
- There is no automatic redirection taking place, so the users have to remember which links they can get away with simply typing in and which ones they have to dig around in the start menu for. ThinApp has a solution for automatically redirecting URLs to specific packages, and there are third party solutions to the problem such as Browsium Ion, but nothing available to solve the problem for App-V.
This post is about solving the first problem by showing the results of my testing and sharing what has now become my standard recipe for sequencing Java. The two main causes of the complications described in the first point above are:
- If Internet Explorer is already running outside the virtual environment, attempting to open a new page can sometimes pass the request to the already running process rather than creating a new Internet Explorer process inside the bubble.
- Insufficient isolation causing Internet Explorer to see multiple versions of Java, and in some cases attempt to load the latest rather than the desired legacy version.
Ensuring IE Gets Loaded Within The Virtual Environment
This one is pretty simple, and was originally shown to me by Colin Bragg (unfortunately the original blog post seems to have vanished). Add the -noframemerging parameter to the Internet Explorer command line, e.g:
C:\Program Files (x86)\Internet Explorer\iexplore.exe -noframemerging http://javatester.org/version.html
This forces IE to open in a new process inside the virtual environment.
Ensuring IE Loads The Correct Java Version
Sometimes even when you employ the trick above to ensure IE is running inside the bubble, certain conditions can cause the browser to load the locally installed version instead of the virtualised one. This is down to the virtual instance not being sufficiently isolated so that it actually sees both versions of Java. Here are a couple of blog posts that describe the issue each with different solutions:
- http://stealthpuppy.com/juggling-sun-java-runtimes-in-app-v
- http://blogs.technet.com/b/virtualworld/archive/2007/08/14/troubleshooting-softgrid-with-process-monitor.aspx
I performed some tests to first of all reproduce the problem reliably, then to see if the proposed solutions above fix the problem. To test this out, the Java test page at http://javatester.org/version.html was used. This uses the deprecated <applet> tag, and in all instances tested, the virtualised Java runtime was loaded rather than the locally installed version. Then to test the results using the **
<html>
  <head>
    <title>Java Tester - What Version of Java Are You Running?</title>
  </head>
  <body>
    <object classid="clsid:CAFEEFAC-0015-0000-FFFF-ABCDEFFEDCBA" width="500" height="150">
      <param name="code" value="http://javatester.org/JavaVersionDisplayApplet.class">
      <param name="image" value="verify_anim.gif">
      <param name="centerimage" value="true">
      <param name="java_version" value="1.5+">
    </object>
  </body>
</html>
With a locally installed Java 7 and virtualised Java 6, at first this worked in the same way, loading Java 6 in the bubble. However, after launching the local Java 7 just once, the results changed. On Windows XP, Java 7 was loaded in the virtual environment instead of v6, and on Windows 7, Internet Explorer stopped responding. The java_version attribute is the important one here, and it accepts the following input types:
- Selecting a specific version:
<param name="java_version" value="1.5.0_11">
- Selecting the latest version from a particular family:
<param name="java_version" value="1.5*">
- Selecting the latest version available with a defined minimum version:
<param name="java_version" value="1.5+">
The value of 1.5+ was making Internet Explorer attempt to load the locally installed v7 instead of the virtualised v6, which in some tests caused the browser to hang. If a value of 1.6* was specified, the virtualised Java 6 loaded correctly. Bringing up the virtual copy of the Java Control Panel highlighted the problem further by showing two versions of the Java plugin active:
I tried the isolation techniques in the posts above but unfortunately could not get them to work to fix the problem reproduced as above. I even wrote a script to generate a huge number of future proof CLSID values and combined the registry entries from every available version of Java into a mega-anti-JRE but it still did not help. The solution for me was not to be found in the registry at all, but in the config file deployment.properties.
The folder hosting this file was not in the VFS of my virtual package, so when Java was launched it was writing this file to the local file system, where it was being shared with the local Java install. This is why everything worked fine until I launched the local Java, after which it always went after the latest version. This also explains why some users suffer from issues and some do not! Important points of note about this file:
- The file is located in a different place on different operating systems:
- Windows XP: %APPDATA%\Sun\Java\Deployment
- Windows 7: %USERPROFILE%\AppData\LocalLow\Sun\Java\Deployment
- If you installed Java via the vendor exe, this extracts the MSI to the locations listed above. If you install via the extracted MSI, this folder structure is not created and therefore not captured.
- If you launch Java via the browser, Java Web Start, or the Java Control Panel, it will re-create the folder structure and create a new deployment.properties file.
- The AppData\LocalLow location is excluded by default in App-V 4.6. It is not actually in the exclusion list, but removing the %CSIDL_LOCAL_APPDATA% exclusion (which equates to AppData\Local) also covers this folder. Nothing needs to be changed in App-V 5 as Root\VFS\LocalAppDataLow is included by default. No changes are required on XP either, as %CSIDL_APPDATA% is also included by default.
- You don’t necessarily need to capture the deployment.properties file (unless you want custom settings in there) as it gets recreated automatically. All you need is for the Sun folder to exist in the VFS to ensure that read/write operations are contained within the bubble rather than redirected to the local file system.
- It should be possible therefore to create a universal package by sequencing on Windows 7 32-bit and creating dummy folders %APPDATA%\Sun and %USERPROFILE%\AppData\LocalLow\Sun whilst monitoring (because 64-bit packages cannot be used on a 32-bit OS and XP does not have the LocalLow folder).
System Config Files
As well as the deployment.properties file that gets created under the user profile, system administrators can also create a system-wide config file, the settings in which can override the user settings. For example, you may have configured your virtualised Java to run in medium security mode to fix a problem with a certain website. If an administrator has deployed a system config file to force Java to run in high security mode, this would override the package settings and break the application.
For this reason, I recommend that you either create your own system config file within your package, or justcreate a dummy folder set to override to hide the local one. The default path for this config file is C:\Windows\Sun\Java\Deployment\deployment.properties. The location of this file can be changed by supplying an additional file C:\Windows\Sun\Java\Deployment\deployment.config (see recipe). Another note about deployment.properties is that you may be tempted to create a barebones config file in the user profile containing just the settings you need. However, from my experimentation, I have found that there is a property named deployment.version (which does not match up with the actual Java version!), which if incorrectly set, causes the settings to be erased and replaced with defaults. This is another reason I recommend putting all desired settings in a system wide config file.
Java 7 Security Features
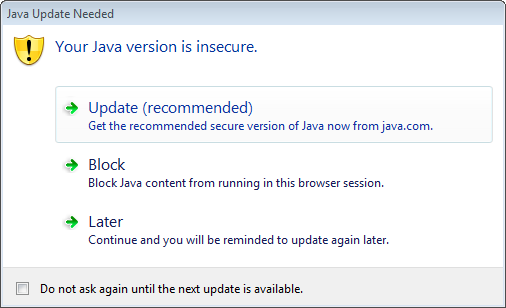
Java 7u10 introduced a new feature which causes the Java plugin to check if an updated version exists before it loads. Then in 7u17 they also added a built-in expiry date so the plugin can complain that it is out of date even if you block it from phoning home at the firewall! If your Java plugin believes it is out of date, this is what you will see first:
Even if you check the box at the bottom, it only ignores the current release and will just pop up again when it detects another Java update has been released. I have seen posts describing ways to suppress this (such as this one) but I did not have any luck with any of them - the only method that worked for me was to set the registry keys that are created by the action of dismissing the dialog:
[HKEY_CURRENT_USER\Software\AppDataLow\Software\JavaSoft\DeploymentProperties]
"deployment.expiration.decision.10.45.2"="later"
"deployment.expiration.decision.suppression.10.45.2"="true"
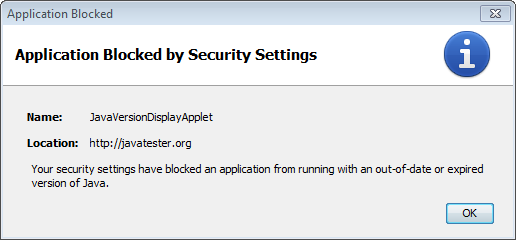
The keys above relate to Java 7u45. Yes, this is yet another versioning system being used by Oracle for the same product, don’t ask my why it says 10.45! Another point of note is that these keys get wiped out if you open and close the Java Control Panel, so do not launch it after setting them! If you are running 7u21 or above, you will run into another hurdle if your applet is unsigned (such as the one used at Javatester.org):
To get past this you need to lower the security level to medium by setting deployment.security.level=MEDIUM in your deployment.properties file. Alternatively, Java7u51 offers a way to do this for specific URLs by adding them to a text file named exception.sites which is then placed in the Sun\Java\Deployment\Security folder.
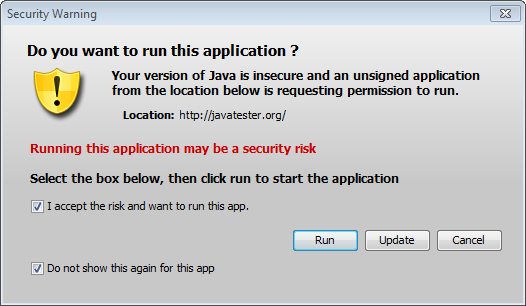
We’re not done yet! The next popup you will see still prompts you to update before running the plugin:
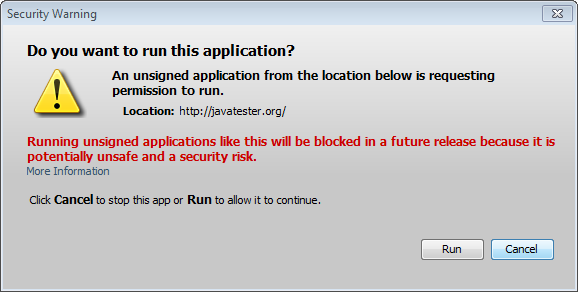
There does not seem to be an easy way to suppress this one except for launching the plugin during sequencing and checking the boxes to not show again. This saves a file under the user’s Sun\Java\Deployment\cache folder, but the format of the folder structure does not offer an easy way to automate this. At least as of Java 7u40, there is a deployment.properties setting you can configure to at least get rid of the update option, deployment.expiration.check.enabled=false, which then changes the dialog to this:
So, security settings in Java 7 are a bit of a mess!
Disabling Java Updates
There seems to be a lot of differing advice around regarding how to disable Java updates, so I decided to get to the bottom of it once and for all, here are my findings:
- All of the Java MSI packages contain three properties related to automatic updates, AUTOUPDATECHECK,JAVAUPDATE, and JU.
- These properties only seem to affect versions v5u11 to v6u18, where setting any one of them to zero prevents a Run registry key being created which launches the Java update scheduler jusched.exe on startup.This isn’t majorly important as App-V ignores these keys, but I set all the properties to zero anyway.
- Java v6u19 onwards separates the Java Update components into a separate MSI package, and both are installed by the main setup exe. If you extract the main MSI and only install that, then you do not have to worry about it.
- The Java Control Panel will display an update tab with updates checked by default for v5u11 to v6u18, and also for v6u19 onwards if the update components are installed. This entire tab can be hidden by setting a registry key (see recipe).
- If you’re going back that far, updates appear to be disabled by default for v5u10 and below.
Sequencing Recipe For Java Runtime
WARNING! - If sequencing using App-V 5.0 SP2 and plan on using global (i.e. per-machine) publishing, you should read this post first and consider creating the sequence using SP1 instead! If Java is sequenced on a 32-bit machine it will work on 64-bit, but it will not be usable on 32-bit if sequenced on a 64-bit machine. I recommend using Windows 7 32-bit to create these packages if portability between 32/64-bit is desirable.
Pre-Sequencing Steps
Download The Source Media
The various versions of Java can be downloaded from the following locations:
- Java 7 downloads: http://www.oracle.com/technetwork/java/javase/downloads/java-archive-downloads-javase7-521261.html
- Java 6 downloads: http://www.oracle.com/technetwork/java/javase/downloads/java-archive-downloads-javase6-419409.html
- Java 5 downloads: http://www.oracle.com/technetwork/java/javasebusiness/downloads/java-archive-downloads-javase5-419410.html
- Java 4 downloads: http://www.oracle.com/technetwork/java/javasebusiness/downloads/java-archive-downloads-javase14-419411.html
Java 3 doesn’t seem to work on Windows 7 so is being ignored.
Extract The MSI Packages
To extract the MSI package (and Data1.cab file), simply launch the executable (no need to install it) then look for the files under the following locations:
- %USERPROFILE%\AppData\LocalLow\Sun\Java (for versions 6 & 7 on Windows 7)
- %APPDATA%\Sun\Java (for versions 6 & 7 on Windows XP)
- %LOCALAPPDATA%\Sun\Java (for version 5)
- %TEMP%_isXXXX (for version 4)
Alternatively, the download and extraction process can be automated using this method described by Remko Weijnen:
http://www.cupfighter.net/index.php/2014/01/100-automation-of-java-updates/
I have modified this script and added a .cmd file wrapper so that you can drag’n’drop the Java exe installer onto the cmd file and extract the MSI automatically, although it only works on v6u19 and above.
Download the script here!
It is possible to use the default provided exe to produce the virtual package, however:
- Extra steps may need to be taken to disable updates.
- Care must be taken not to install the Ask toolbar, which is bundled in some Java releases.
- The source MSI that gets extracted during installation should be manually deleted to save space in the resulting sequence.
Modify The Exclusion List
The following path should be added to the exclusion list for all operating systems and App-V versions: C:\Windows\Installer
I don’t recommend adding this to a standard template as sometimes icons are stored in here and excluding them can have detrimental effects, but it is safe to do so with the Java installers. Then, if you are sequencing on Windows Vista/7 or above using App-V 4.6, you will need to remove the following exclusion: %CSIDL_LOCAL_APPDATA%
Installation Location
In App-V 4.6, it should not make much difference whether Java is installed to the virtual mount drive or the VFS. However, all testing was done with Java installed to its default location in the VFS, as this should in theory provide extra isolation by masking the locally installed Java files since the root Java folder gets set to override. In App-V 5, it is recommended to install Java to its default location, but set the PVAD (Primary Virtual Application Directory) in this case to a random folder e.g. C:<PACKAGENAME>. This ensures the main Java folder is set to override as described above, but is also advised due to a strange issue that was sometimes seen when installing into the PVAD, where the root folder contained nothing but empty folders mirroring the same folder structure filled up in the VFS; the net result of this was a bunch of empty folders when viewed on the client.
Monitoring Steps
Installation
Install the extracted MSI. Example command line:
msiexec /i jre1.6.0_45.msi /qb AUTOUPDATECHECK=0 JAVAUPDATE=0 JU=0 ADDLOCAL=ALL
ADDLOCAL=ALL is optional but it enables extra non-default features in Java 4 & 5.
Configuration
Set the following registry key:
[HKEY_LOCAL_MACHINE\SOFTWARE\Wow6432Node\JavaSoft\Java Update\Policy] (on 64-bit Windows)
[HKEY_LOCAL_MACHINE\SOFTWARE\JavaSoft\Java Update\Policy] (on 32-bit Windows)
"EnableJavaUpdate"=dword:00000000
Next, set up your config files. Create a folder %USERPROFILE%\AppData\LocalLow\Sun (Windows 7) or %APPDATA%\Sun (Windows XP) if it does not already exist. If sequencing on Windows 7 32-bit, creating both folders should result in a package that works on all platforms.
Create a file C:\Windows\Sun\Java\Deployment\deployment.config with the following contents:
deployment.system.config = file:\\C:\\WINDOWS\\Sun\\Java\\Deployment\\deployment.propertiesThen create a file C:\Windows\Sun\Java\Deployment\deployment.properties. The contents of this will be optional depending on your Java version and desired settings, but here is an example:
deployment.expiration.check.enabled=false(to prevent the upgrade button in the dialog when running unsigned Java code. Only applies to Java 7u40 and above.)deployment.security.level=MEDIUM(required to enable expired versions of from Java 7u21 to run unsigned code)deployment.security.level.locked(this forces the security level to override the setting in the user deployment.properties and disables the slider in the Java Control Panel)
To suppress additional update prompts in Java 7u10 and above, set the following registry keys, replacing the 45 in the version field with your Java update version (e.g. 10.51.2 for Java 7u51):
[HKEY_CURRENT_USER\Software\AppDataLow\Software\JavaSoft\DeploymentProperties]
"deployment.expiration.decision.10.45.2"="later"
"deployment.expiration.decision.suppression.10.45.2"="true"
It is recommended to remove the file associations with .JAR and .JNLP files unless this package is going to be the main version of Java. If a local version of Java is installed we do not want this virtual package to override its file associations. To do this, delete the following registry keys:
[-HKEY_CLASSES_ROOT\jarfile\Shell]
[-HKEY_CLASSES_ROOT\JNLPFile\Shell]
An extra thing I like to add is a modification to the browser title bar as a visual indicator that the browser is using a different version of Java. Unfortunately the title bar is no longer displayed in IE9 onwards, however the text can still be seen when hovering the mouse over the icon on the taskbar.
[HKEY_CURRENT_USER\Software\Microsoft\Internet Explorer\Main]
"Window Title"="Internet Explorer with Java 6u45"
Some versions of Java create shortcuts which need to be deleted:
- Java 4 - Delete Desktop\Java Web Start and Start Menu\Java Web Start shortcuts
- Java 7 - Delete Start Menu\Java shortcuts
I’ve automated all of these steps in a batch file which you can download here.
Post-Monitoring Steps
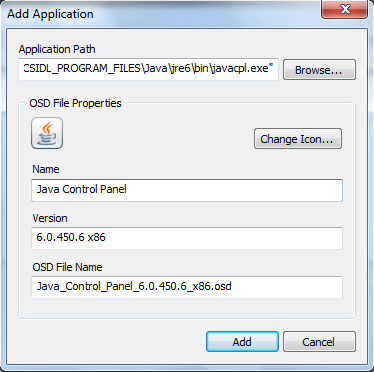
Delete any captured applications and create a new application pointing to the Java Control Panel. The location for this in Java 6 x86 on a 64-bit machine is: C:\Program Files (x86)\Java\jre6\bin\javacpl.exe
The control panel is in a similar path for versions 5, 6 and 7, although the 64-bit Java versions are located under C:\Program Files instead of C:\Program Files (x86). For Java version 4, the control panel is named jpicpl32.exe (also it has no icon by default but one can be set manually). Modify the properties as per your own naming standards.
Bear in mind that for App-V 4.6, the name + version joined together needs to be unique for each application, as does the OSD filename. It is recommended to append x86 or x64 to the version number at this point to prevent naming conflicts as a result of virtualising both 32-bit and 64-bit variants of the same Java release.
A shortcut is added by default when adding a new application, so this should be removed by expanding Shortcuts, pressing Edit Locations, and unchecking the box for the Start Menu. In App-V 5, the applications are added and shortcuts are modified in the very last tab of the final sequencing stage. The sequencer has a bug that means shortcuts cannot be edited, but they can be removed by pressing the delete key.
If sequencing Java 7u10 or above and you have set the registry keys to suppress the update prompt, remember do not launch the Java Control Panel as it will erase those settings!


Comments