Building an App-V Lab Part 3: Installing App-V
After Part 2, you should now have a few VMs set up and talking to a domain controller. Before going any further you should make sure you have a copy of the latest MDOP 2011 installation ISO image as well as the latest hotfixes. I recommend creating an entirely new VM rather than install any more stuff on the domain controller. If you haven’t already done so, download and read the App-V trial guide, as it contains very thorough information for installing all of the components in a lab environment. However you may come across a few problems following these instructions as I did, and there’s a couple of things I chose to do differently.
Management Server
I installed IIS and SQL Server 2008 R2 Express and the App-V Management Server as per the guide. Don’t miss the bit about setting the SQL Browser to automatic, otherwise the App-V server installer won’t be able to find your SQL server. I decided to put the content share at C:\Content rather than the default so that I didn’t have to dig through as many folders. I found that the Application Virtualization Management Server didn’t always start up after a reboot, even though I had added a dependency on SQL Server. Changing the startup type to Automatic (Delayed Start) seemed to help though which makes the service start about a minute after logon. When trying to start the server management console I got this error:
Unexpected error occurred. Please report the following error code to your system administrator. Error code: 0000C800
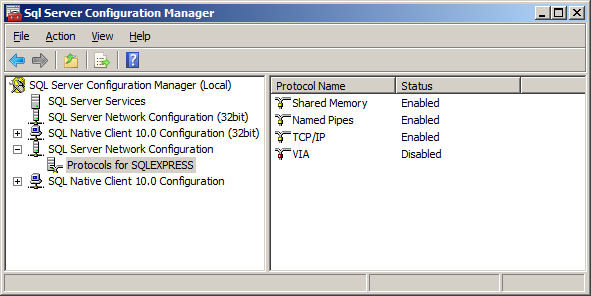
I tried troubleshooting it using the guidance here, which didn’t help me. In the end, all I had to do was enable TCP/IP in the SQL Server Configuration Manager. I also enabled Named Pipes just in case:
After everything was installed and starting correctly, I installed the v4.5 SP2 Hotfix 2 update. I also created a DHCP reservation on the domain controller for the server so that it will always get the same IP address.
Client
The client is a straightforward install. One addition however is to add the %SFT_SOFTGRIDSERVER% environment variable to point to the management server, as this is the default host used by the sequencer. The client service will need a restart after changing this variable. At this point you get to test the connectivity to the server so you may experience some issues streaming down the default test application if everything hasn’t been set up properly. For example, I hadn’t modified the OSD files of the default application correctly and the server service was not starting properly after a reboot, but once I resolved those issues everything was working. Once complete, I installed the v4.6 SP1 Hotfix 4 update package.
Sequencer
First of all, don’t bother installing the sequencer from the MDOP ISO; the v4.6 SP1 Hotfix 3 version is a complete installer rather than a patch file, so skip ahead to installing that. Before you do that though, and this is not mentioned in the trial guide, you should create and attach another virtual hard drive to the PC. Format it and mount it as Q: unless you know you will be using a different drive letter for your project. As of v4.6 SP1, the sequencer supposedly no longer requires a separate drive and will create one by folder substitution. However there is a bug with this that can result in broken COM registrations as detailed here, and until this is resolved you should always use a separate drive.
One other thing to be aware of is that you should not take a snapshot of the machine on with the sequencer running as you may end up with conflicting duplicate package GUIDs. You should repeat the above so that you end up with both 32-bit and 64-bit Windows 7 clients / sequencers. Some people even advocate sequencing on an XP image so you may well want to create one of those also.
Happy sequencing!


Comments