Building an App-V Lab Part 2: Building the Network
If you followed Part 1 of this series, you should now have a few Sysprepped images with linked clones created from them for all of your required machines. Now comes the task of setting up the network.
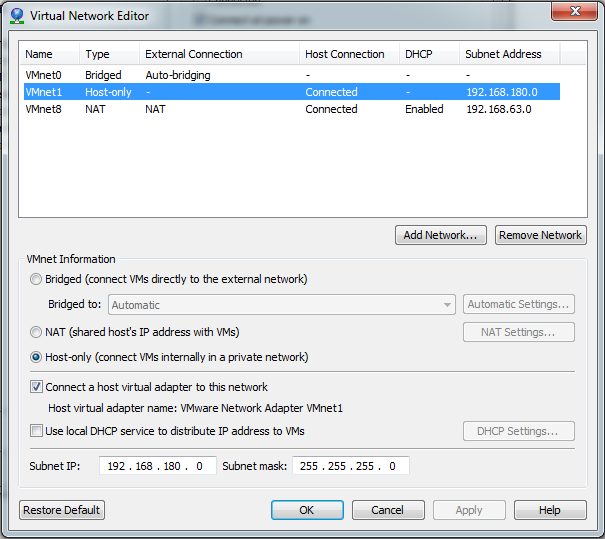
The aim is to set up a virtual network that’s isolated from the outside world and from other machines on my home network, yet with each machine being able to communicate with one another and also have internet connectivity. The best way to do this is to put each machine on an internal private network (termed Host-only in VMWare). The domain controller will be on this network but will also have an extra network interface connected to the internet via a VMWare NAT connection, with routing set up so that the server acts as an internet gateway for the other machines. It’s best to choose specific VMWare networks for this rather than relying on automatic settings; use VMnet1 as the private host-only LAN connection and VMnet8 as NAT connection with internet access. Since we will install a DHCP server on the domain controller, we will need to disable the virtual DHCP server that is enabled by default on VMnet1:
Each machine should have it’s primary network interface connected to VMnet1. They won’t be able to ping each other just yet or access the internet until we have configured DHCP and routing on the DC. Add a secondary network interface to the DC and connect this to VMnet8. Then to configure the network interfaces:
- Change Local Area Connection 1 (our private LAN on VMnet1) to a static IP address. I used 192.168.80.2, with subnet mask 255.255.255.0, gateway left blank, and preferred DNS server also to 192.168.80.2.
- Give Local Area Connection 2 (the NAT connection on VMnet8) a static IP address also. Run the command
ipconfig /allto find the current settings coming from the virtual DHCP server. Change the IP to something outside of the DHCP range (I chose192.168.63.3), subnet mask to 255.255.255.0, and the gateway and DNS servers to 192.168.63.2 (copy these settings from the ipconfig results). If you’ve done this right you should still have an internet connection from your server.
Then to configure DHCP:
- Add the DHCP Server role and select the network connection bound to the private LAN VMnet1 (192.168.80.2 in my case)
- Enter that same IP as the preferred DNS server
- You probably won’t need WINS but I selected it anyway, put in the same IP again
- Add a DHCP scope. I chose 192.168.80.100 - 192.168.80.254, so that if we want any more static IPs on this network we have the range below 100 free. Set the default gateway here to the IP of the server 192.168.80.2.
- Leave DHCPv6 and IPv6 settings as default
- Leave current credentials selected to authorise the DHCP server, press Install
Any other VMs connected to VMnet1 should now be able to receive a DHCP IP address, but they won’t yet have internet connectivity. I found three different ways of achieving this; configuring the server for Routing & Remote Access using either NAT or RIPS, or installing Microsoft Forefront Threat Management Gateway (formely known as ISA Server). I went with the NAT option as it’s the simplest to set up:
- Add the role Network Policy and Access Services and select Routing and Remote Access Services
- Go to server manager, expand to find the new role, right-click on Routing and Remote Access Services and select Configure and Enable Routing and Remote Access
- Select NAT and select the interface that connects to the internet (192.168.63.3 on VMnet8)
Now if you go to one of your other VMs you should now have internet access! Next configure the domain controller:
- Add the Active Directory Domain Services role and follow the prompts to launch dcpromo.exe to configure your domain
- Go through the wizard to create a new domain in a new forest and give it a name such as testlab.local
- Set the forest functional level to Windows Server 2008 R2
- Select the option to install the DNS Server
- Ignore the delegation warning that appears, accept the default folders, then enter a password for the Directory Services Restore Mode Administrator account
- After a reboot you can log in using the domain Administrator account!
Now you should create a couple of domain accounts that you can use across all of the machines, e.g. testuser and testadmin. When creating the accounts under Active Directory Users and Computers, remember to untick the box ‘user must change password on next login’ and tick the box for ‘password never expires’, and add the testadmin user to the Domain Admins group.
It’s also a good idea to configure the default domain policy to prevent the changing of machine accounts, otherwise you may find your machines dropping off the domain when rolling back to old snapshots.
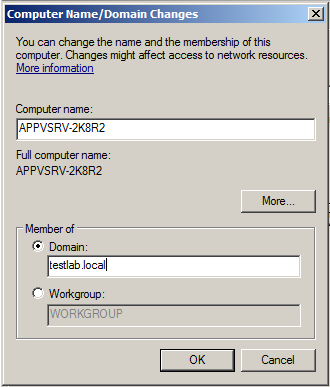
Once you’ve done these things you can try joining one of your other machines to the domain. If you haven’t already done so, it’s a good idea to rename the machine to something meaningful as you do this:
It will then prompt for a reboot, after which you can then login with a domain admin account rather than the local administrator. You’ll need to do this to all of the other machines in the lab too.
Now that we have the basis for our mini corporate network, click here for Part 3 which covers installing the App-V management server, sequencer and client.


Comments